Benefit from your Excel VBA Know-how
In this tip and trick we want to show you how to activate and use Excel’s VBA commands from within INOSIM’s VBA-Editor.
Using the integrated Excel-Workbook with INOSIM’s VBA commands
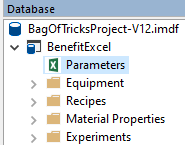
In INOSIM, each project provides an integrated Excel-Workbook, called Parameters. It can contain both Excel sheets for input data, and sheets designated for customized result reports. The workbook can be opened by double-clicking its entry in the database window:
You can also access the workbook with the integrated Visual Basic editor in INOSIM. For that purpose INOSIM provides dedicated Visual Basic commands.
For example, if you want to write the names and filling levels of all units to a sheet in the Excel workbook, you can use the code below.
'Using INOSIM commands
    'to write the name and filling levels
    'of all units to the Parameters-Table

    Dim unitIndex As Integer
    Dim mySheet As Sheet
    Dim mySheetName As String

    mySheetName = "FillingLevelsSheet"
    mySheet = Parameters.Sheets(mySheetName)


    For unitIndex = 1 To Units.Count
        'For each unit, a row is written in the specified sheet
        'the first column contains the name of the unit,
        'the second column contains the contents of the unit
        '
        ' Note that the first row of the sheet is skipped, as a user-written header
        mySheet.CellYX(unitIndex+1,1) = Units.Item(unitIndex).Name
        mySheet.CellYX(unitIndex+1,2) = Units.Item(unitIndex).Contents
    Next
In this example, WWB.NET is used. For WWB-COM, add Set for object assignments. In the Downloads area, you can find both language versions.
The result might look like this:
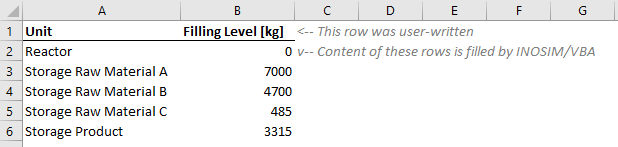
The names and filling levels of all units are transferred to the Excel sheet FillingLevelsSheet, which has to be created beforehand.
The sheet contains the names in column A and the filling levels in column B.
In this example the first row containing the header was also written manually, thus the code skips the first row when writing into the Excel sheet.
Using Microsoft Excel’s Visual Basic commands
The same results as above can be achieved by using the Excel’s Visual Basic commands. This means that INOSIM users which already know these commands do not have to change to the special Visual Basic syntax applied by INOSIM. Instead, they can benefit from their knowledge of Visual Basic while working with INOSIM.
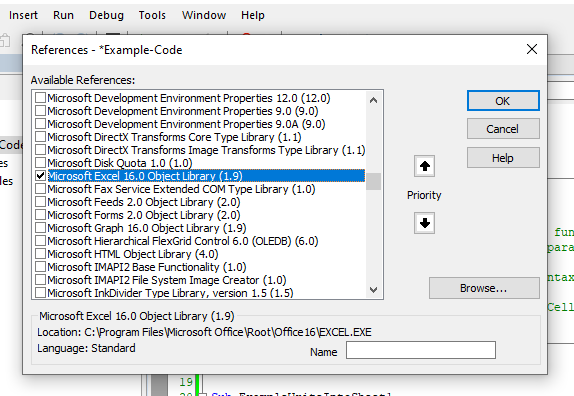
Enabling Excel’s Visual Basic commands
To use the Excel’s VBA commands, enable the Microsoft Excel Object Library in the Visual Basic Editor (Menu Tools/References) and press OK:
Afterwards you can use the ExcelWorkbook Property, which allows you to use Visual Basic commands like:
mySheet = Parameters.ExcelWorkbook.Worksheets("Table 1")This is WWB.NET. As it is an object assignment, add a Set in WWB-COM.
Using Excel’s Visual Basic commands
To replicate the behavior from the example above, the following code can be used:
'Using standard Visual Basic commands to write
    'the name and filling levels of all units to the Parameters-Table

    Dim unitIndex As Integer
    Dim mySheet As Worksheet
    Dim mySheetName As String

    mySheetName = "FillingLevelsSheet2"
    mySheet = Parameters.ExcelWorkbook.Worksheets(mySheetName)

    For unitIndex = 1 To Units.Count
        mySheet.Cells(unitIndex+1,1).value = Units.Item(unitIndex).Name
        mySheet.Cells(unitIndex+1,2).value = Units.Item(unitIndex).Contents
    Next
This example is in the language WWB.NET. For WWB-COM, add a Set for object assignments.
Unlocking Excel’s VBA Potential
You can now access all of Excel’s default VBA commands, resulting in endless possibilities to change this workbook. Add, rename and delete sheets, change the cell format (e.g., set a background color or change font size and color), create and design diagrams, and much more. For a full documentation visit Microsoft’s Excel VBA reference.
Example: Cell referencing with names
For example, cells can be named to ease referencing. Here, the name MyReferenceCell was assigned to cell B2 in sheet FillingLevelsSheet3. The cell can now be easily referenced, when reading or writing data with Visual Basic. This ensures that the code will continue to work, even if lines or columns are added (and thus, their numbers change).
In the following code snippet, names and fillings levels of all units are once again written to a sheet, but their position in the sheet is relative to the position of the named cell MyReferenceCell:
'Using standard Visual Basic commands to write
    'the name and filling levels of all units to the Parameters-Table
    'starting with a reference cell
    '
    ' The Microsoft Excel Object Library has to be enabled for this to work
    ' Can be enabled from the topmenu: Tools/References

    Dim unitIndex As Integer
    Dim mySheet As Worksheet
    Dim mySheetName As String
    Dim referenceCellName As String

    mySheetName = "FillingLevelsSheet3"
    referenceCellName = "MyReferenceCell" 'The name of cell B2 in the sheet FillingLevelSheet2
    mySheet = Parameters.ExcelWorkbook.Worksheets(mySheetName)

    For unitIndex = 1 To Units.Count
        mySheet.Range("MyReferenceCell").Offset(unitIndex,0).Value = Units.Item(unitIndex).Name
        mySheet.Range(referenceCellName).Offset(unitIndex,1).Value = Units.Item(unitIndex).Contents
    Next
This example Is In the language WWB.NET. For WWB-COM, add a Set for object assignments.
- Example Project
- PDF printout of this Tip & Trick
More Questions?
Want to know more about this topic or have another question? Please contact us!
More Tips & Tricks
Custom Curves and Properties Of Curves in INOSIM Gantt
Custom Curves and Properties Of Curves in INOSIM Gantt In your model, the same raw material is stored in several tanks, and you wish to…
In INOSIM, the availability of resources and units can be represented using Shift Calendars. A Shift Calendar determines when a unit is available or how…
Animated Graphical Objects In INOSIM
Graphical auxiliary functions give live to your plant layout: By animation, you dynamically display filling level changes, transport movements of objects, or the status of…